JuJu 2 with MAAS on Ubuntu Xenial 16.04
Contents |
Introduction
This is a quick guide to using JuJu on top of MAAS on Ubuntu Xenial. We will use a single physical host with a few KVM virtual machines that will serve as MAAS nodes.
MAAS
First we’ll get MAAS setup and working with a few virtual machines.
Set Up the Host
- Install Ubuntu 16.04 (I used Desktop)
- Install Packages:
sudo apt install -y qemu-system virt-manager openssh-server - Start services;
sudo systemctl enable libvirt-bin && sudo systemctl start libvirt-bin - Adjust permissions
sudo usermod -a -G libvirtd <YOUR_USERNAME> - Log out and log back in so the permissions take effect. (or use newgrp, or sudo as needed)
- Ensure the Ubuntu Server ISO is available at /var/lib/libvirt/images/.
We need qemu-system and virt-manager to set up the virtual machines. We will use openssh-server to allow SSH access from the maas-master VM for controlling some of the VMs.
Set Up the VM Environment
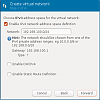
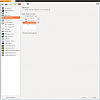
- Run virt-manager.
- Right-click on the QEMU/KVM line and select “Details”.
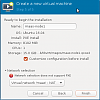
-
On the Virtual Networks tab, click the button to create a new virtual network as shown here:


Install the MAAS Region & Rack Controller
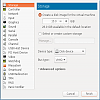
-
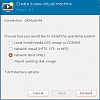
Create a new VM to install the MAAS Region Controller.

-
Install the MAAS Region Controller. Most steps are omitted here as the defaults are acceptable or common sense.


With the installation complete, you can verify that the basics are working by doing the following:
- SSH to the machine (192.168.100.2) using the credentials you created during install.
- Access the web interface at http://192.168.100.2:5240/ using the other set of credentials you created during install.
Verify this all works before continuing.
Optionally, you may want to enable auto-starting for this VM:
virsh autostart maas-master
Set Up DHCP
Now we want the MAAS controller to run DHCP on the VM network we created.
- Log in to the web interface at http://192.168.100.2:5240/.
- Navigate to the Networks tab at the top.
- Click on the ‘untagged’ link under the VLAN column.
- Click the dropdown item at the top that says ‘Take Action’, and select ‘Provide DHCP’.
- You can accept the defaults and just continue with the “Provide DHCP” button.
For verification, you can SSH to maas-master (192.168.100.2) and confirm that dhcpd is running (pgrep dhcpd should return a number).
Setup libvirt Access on MAAS Controller
We want the MAAS controller/master to be able to start and stop VMs on the host. To accomplish this, we will need to install a package and setup public key auth from the MAAS Region Controller to the VM host it runs on.
- SSH to maas-master (192.168.100.2).
- Install required libvirt client software:
sudo apt install libvirt-bin - Become the ‘maas’ user:
sudo su -ls /bin/bash maas - Create a key pair:
ssh-keygen -f /var/lib/maas/.ssh/id_rsa -qN '' - Copy the public key to the host system:
ssh-copy-id <USERNAME_ON_HOST>@192.168.100.1 - Verify that things are working:
virsh -c qemu+ssh://<USERNAME_ON_HOST>@192.168.100.1/system list
Set Up MAAS Nodes
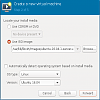
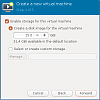
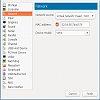
Now we want to set up 4 VMs that will take on the role of MAAS nodes. Let’s look at setting up the first one.
Note here that we’re selecting the option to customize the VM before installation. Then we are adding a second disk, and a second network interface before continuing with the installation (which is just network booting in this case).


If everything goes as planned the machine should power on and network boot as shown in the last step above. It will boot up and run some cloud-init routines and then reboot.
After rebooting it will probably be stuck complaining about no boot devices being found. This is because the boot options are ‘helpfully’ changed after the reboot. (To be fair, normally this is what you want!)
To fix things back up, force the VM off and modify the boot options:
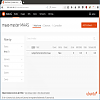
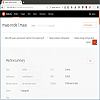
Now let’s check back in to the web interface of the region/rack controller. You’ll find a new node under the Nodes section. It will have a random name, which you may want to change as I did here:

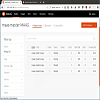
On this same page, we will want to scroll down and set up the power control for this node:
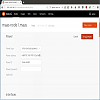
The “Power address” I used here was qemu+ssh://<USERNAME_ON_HOST>@192.168.100.1/system.
Finally, we will want to ‘commission’ the node. This will power the VM up, network boot it, and gather information about the node (CPU core count, RAM, etc). It will then power down the node.
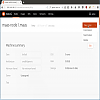
Check the web interface for the node and you should see the CPU core count, RAM, storage, and other values all filled in.
Now repeat this section until you have 4 nodes ready to as shown in the previous image. Alternatively you can automate most of this with something like this:
      virsh dumpxml maas-node1 > node.xml
id=$(virsh domuuid maas-node1)
for node in 2 3 4 5; do
    sed "s/maas-node1/maas-node$node/g" node.xml > node$node.xml
    sed -i "s/$id/$(uuidgen)/g" node$node.xml
    qemu-img create -f qcow2 /var/lib/libvirt/images/maas-node$node-1.qcow2 15G
    qemu-img create -f qcow2 /var/lib/libvirt/images/maas-node$node-2.qcow2 15G
    virsh define node$node.xml
done
You’ll still need to virsh edit maas-node{2,3,4,5} and ensure MAC addresses are unique.
JuJu
Now we’ll get JuJu 2 set up on the host machine and deployed into MAAS.
Install Packages
We only need a single package here:
sudo apt install -y juju-2.0
JuJu+MAAS
We’ll need to create a file to describe our MAAS cloud:
maascloud.yaml
      clouds:
  maascloud:
    type: maas
    auth-types: [oauth1]
    endpoint: 'http://192.168.100.2:5240/MAAS'
Now we can inform JuJu about this cloud: juju add-cloud maascloud ~/maascloud.yaml
You can verify that it has been added with: juju list-clouds (look for local:maascloud)
Now we’ll need to add credentials for MAAS.
- Navigate to http://192.168.100.2:5240/MAAS/account/prefs/ and grab the API key from the top of the page.
- Run
juju add-credential maascloud. - Enter some name for the credential.
- Paste the API key from step 1.
You can run juju list-credentials to verify the credentials were added.
Finally we are ready to bootstrap JuJu in our MAAS cloud.
juju bootstrap maascloud-controller maascloud
At this point JuJu should be up and running! You can now deploy applications and bundles on to the VMs (also in LXD containers on the VMs).